Air trapped in a radiator can reduce water circulation and cause uneven heating. Bleeding a radiator is often a straightforward maintenance task, but the correct procedure depends on the heating system and radiator type. If you are unsure, if the system is hot or pressurised in an unfamiliar way, or if the problem keeps returning, contact a qualified heating professional.
This guide explains common signs of trapped air, how a typical manual bleed valve is used and when further investigation is advisable.
Why does air collect in radiators?
Air can enter or collect in a heating system:
- after the heating is restarted following a long break,
- after maintenance or replacement of system components,
- where there is a leak or pressure problem,
- when the pressure in a sealed central-heating system is too low.
Trapped air can reduce radiator output and thermal comfort. Frequent recurrence may indicate a system fault rather than a need for repeated bleeding alone.
Common signs of air in a radiator
Look for patterns such as:
1. The top is cool while the lower section is warm
This is a common sign that air is preventing hot water from filling the radiator correctly.
2. Gurgling or unusual water-flow noise
Noise can be associated with air in the system, although pumps, valves and flow conditions can produce other sounds.
3. Reduced heat output
The room warms more slowly even though the heating system is operating.
Under stable conditions, a correctly operating radiator is commonly warmer near the inlet and upper section and cooler towards the outlet and bottom. The exact pattern depends on the radiator, connection arrangement, flow rate and control settings.
What can thermal imaging show?
A thermal camera shows the surface-temperature pattern of a radiator at the time of inspection. A cool upper area with a warmer lower section can be consistent with trapped air, but the image must be interpreted alongside the system layout and operating conditions.
Other causes — such as low flow, a closed or faulty valve, sludge, balancing problems or a circulation fault — can create different or partly similar patterns. Palette colours are relative to the selected temperature range and do not have a fixed diagnostic meaning on their own.
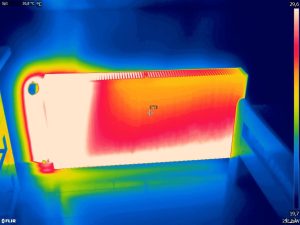
How can the pattern change after bleeding?
Once trapped air has been released and circulation is restored, the radiator surface should warm progressively. The sequence below documents the temperature distribution in this particular example.
1. Thermogram taken immediately after bleeding the radiator.
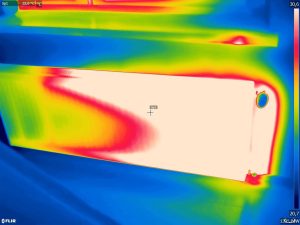
2. The surface temperature increases over time.
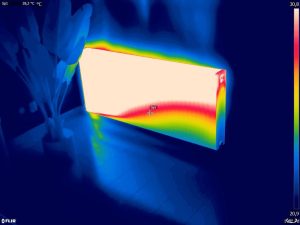
3. Thermogram after the radiator has warmed more fully.
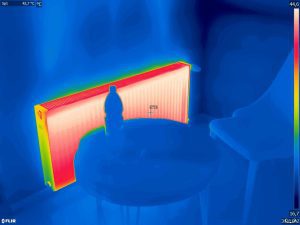
The video shows how trapped air was identified and released in this example and how the surface-temperature pattern changed during the following minute.
What do you need?
For a typical radiator with a manual bleed valve, you may need:
- the correct radiator key or a flat-blade screwdriver, depending on the valve,
- a cloth and a small container to catch water.
Do not use a tool that does not fit the valve. Check the radiator and boiler manufacturer’s instructions before starting.
How to bleed a typical radiator safely
Step 1: check the system instructions and let it cool
Switch the heating off and allow the radiator to cool enough to work safely. Hot water or steam can cause burns. In a communal or unfamiliar system, contact the building manager or heating professional instead of operating the valve yourself.
Step 2: protect the surrounding area
Place a cloth and container beneath the bleed valve to catch any water.
Step 3: locate the bleed valve
On many radiators it is near the top, on the side opposite the thermostatic head. Radiator designs vary, so confirm the correct fitting.
Step 4: open the valve slowly
Hold the cloth near the outlet and turn the valve very slowly with the correct tool. A hissing sound may indicate air escaping. Do not remove the valve or open it excessively.
Step 5: close the valve when water appears
When the hissing stops and a steady trickle of water appears, close the valve gently. Do not overtighten it.
Step 6: check the system
After bleeding, check the system pressure and follow the boiler manufacturer’s instructions. Do not refill or repressurise an unfamiliar system without the appropriate guidance. Restart the heating and observe the radiator for leaks and more even warming.
If the radiator remains cold, the cause may be elsewhere in the system.
When should a professional investigate?
Contact a qualified heating professional if:
- air repeatedly returns to the radiators,
- water leaks from the bleed valve,
- boiler pressure rises or falls unexpectedly,
- the radiator remains cold after bleeding,
- you cannot identify the system type or safe procedure.
Possible causes include leaks, blocked filters, sludge, pump or valve faults, incorrect balancing or a boiler/system-pressure problem. These require diagnosis rather than repeated bleeding alone.
Safety note
This guide describes a typical manual radiator valve and does not replace the instructions for your heating system. Do not proceed if you are uncertain, the equipment is hot, the valve is damaged or the installation is communal or otherwise outside your responsibility.
Call +48 530 105 398 or email biuro@termocent.pl